
Many of us working in the construction field understand the importance of a well thought out construction schedule and at times we have lived through the pain of a schedule that didn’t take all of the build components into consideration.
I would like to cover a few topics that will help you build and maintain a schedule which will benefit your project and will stand up to scrutiny in the event of a problem.
Before you begin building a schedule some planning needs to go into its development. Who should be involved in creating the schedule, should every task, and to what detail should each task be described. Who is the intended audience and what will be the final use of the schedule and how often will the schedule be updated are some of the things that should be taken into consideration.
Often this process is a very brief meeting outlined in few of the items below:
- Are specific Scheduling Software requirements identified by owner contract?
- Does the contract require routine schedule updates to be performed?
- Who is required to be on distribution?
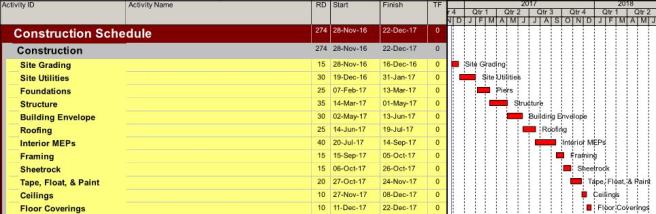
- What format is required? Gantt, CPM, etc.
- Are working files or .PDF’s required to be distributed to the team?
- Full Schedule, 90 day Schedule, 6 or 3 week look ahead or In Progress and Remaining Updates.
- Amount of activity detail required.
The Project Superintendent and Project Manager are jointly responsible for the creation of the construction schedule on most projects, but depending on the company you work for and the complexity of the build many others may have input. Operations Mangers, Project Coordinators, Trade Project Managers, or Trade Superintendents all will have some responsibility to the schedule. I would recommend that all stakeholders get an opportunity to review the schedule before it gets finalized regardless of who creates the schedule.
Before getting started you will need to have a good understanding of the project scope, along with the types of activities that need to be included, such as the following:
- Owner Contract Award – NTP and anticipated start and completion dates
- Architectural Design Activities
- Subcontractor Bid Process
- Drafting and Executing the Subcontracts and Insurance Requirements
- Submittals, Shop Drawings, BIM (Building Information Modeling)
- Long Lead Items (Fabrication and Procurement)
- Building activities and Milestones
- Punch list
- Building Permit Inspections and CO’s
- Closeout
- Owner move in and Occupancy
The items listed above are just a few types of activities that you might find in a typical construction schedule. Schedules can range from a simple one page design development schedule covering many months or years, to individual project schedules that may have 100 or more pages. Some schedules get updated weekly, bi-monthly or monthly depending on the contract requirements or the project needs.
I would recommend utilizing a scheduling program like Primavera’s P6, Microsoft Project or Phoenix Project Manager if you plan on building a schedule that is more than just a few pages and one that will be need to be updated regularly. These are a few software applications you could consider depending on your needs and the complexity of the project, however, I have also built many schedules using Excel or on a simple graph paper.
Once you have completed the planning portion of the schedule, the next step is building the schedule structure. Generally, the project superintendent or the individual responsible for the schedule creates a rough layout. This is typically associated with listing and grouping all the tasks necessary to complete the project. I recommend keeping the details at a pretty high level at this point and getting most of the major components identified, then the details can come later. If you are on a very complex project you may be breaking the project up into components or packages by utilizing the Work Breakdown Structure or (WBS). Continue brainstorming and looking through the plans to capture all the major components, such as:
Once you have the major components in place, you can begin to add the detail.

Then each area can be broken down even further.

Once the desired level of detail in the task descriptions is reached, durations can then be assigned to each activity 1d, 5d, 10d etc. Continue down the list until you have added the required durations for each of the activities. At this point you will want to tie each of the activity predecessors to the successors. This links each activity and will create the overall duration; after linking the activities you may find that the overall project length is going beyond the contractual completion date. This can be managed by adjusting the finish to start relationships or the lead/lag of each activity. For example if hanging the sheet rock on the project is going to take 30days, can you start the Tape/Float/Paint task before the end of the 30days? You might also use a Start to Start relationship with a 15 day lag allowing the painter to start 15 days into in the installation of the sheet rock. This will reduce the overall duration of the area by 15 days.
There are a few commonly accepted dependencies in the task sequencing like Finish to Start, Start to Finish, Start to Start and Finish to Finish. It is very important that all activities are tied in some predecessor/successor relationship with the exception of the first and last activity in the construction schedule. It is bad scheduling practice to leave open ended tasks. Additionally, it is a good idea to place a few milestones into the schedule. A milestone is an activity point of reference identifying key tasks like Topping Out, Building Dry-In, Permanent Power, Conditioned Air, TCO, etc. These project milestones provide a simplified view of the key components in the schedule.
Depending on the project you may be in a situation where at the beginning of the project not all of the information is available to completely detail out the job. For example, you may have detailed foundation/structural drawings but the landscaping package may not have been released. By having conversations with the owner and/or design team you can make assumptions about certain activities, using the activities as placeholders which can be expanded upon as more information comes available. It is very important to include these placeholders and identify them as assumptions with clarifications made in the schedule notes or narrative.
At this point I generally go back and review the schedule to verify that we have all of the individual tasks in the schedule, checking each of the durations, then verifying if they are properly tied to each activity. If your project has trade Superintendents take time to allow them to go through and verify that all of their activities are properly placed and the sequenced.
Once this is complete I generally request that the Project Coordinators go through and add all of the submittal, shop drawing, and material availability dates to the schedule. For example you can’t install the light fixtures if they have not been approved, ordered, manufactured, and delivered. Once this happens for all of the key materials needed on the project they are then individually placed in the schedule and properly tied to the procurement activities as the predecessor. The subsequent installation activity will be the successor your schedule is starts to develop.
Next I request that the Project Manager reviews the schedule checking for accuracy in the contract, design and construction activities along with getting some concurrence on the durations and the sequence of work. They typically review contractual start and completion dates, adjust for any project constraints and the scheduled blackout dates. A conversation needs to be had about the project calendar, if you are planning on working a 5 day work week with the 6th and 7th day being utilized as a makeup day. Also holidays need to be considered if you are not going to work on those days. Consideration should be taken for any owner identified special work restrictions, along with elements that have been identified that cannot be started until other areas are completed because of their being utilized and cannot be taken out of service until the replacement is completed or a temporary one provided.
Through the years I have found it useful to request that each of my subcontractors, both Project Manager’s and Superintendents, review the schedule looking for missing scope, commenting on durations, discussing product availability and providing concurrence the project can be built as currently sequenced and scheduled. Usually this is done in a joint meeting with the General Contractor and each individual sub where comments can be heard, addressed, and make adjustments if necessary. If desired you can resource load your schedule at this point. As an example, if you know how many crews your drywall contractor will be working you may be able to accelerate activities because you have been assured you will have the teams to start concurrent construction activities. Additional thought can be applied to the need to run multiple shifts versus working overtime, along with additional supervision and shift work costs versus the cost of overtime, production lost and safety considerations of working crews extended overtime shifts. Each of these should be considered on long a term project as well as, the cost to employee morale and safety.
You should have a substantial schedule coming together at this point. You may need to make some lead/lag task adjustments, correct any duration’s assumptions, and generally get the schedule to fit within the contractual Start and Finish dates. I would recommend going through this version one last time as a Project Manager and Superintendent to verify you can live with all the assumptions.
It is considered good business practice to incorporate this schedule into each of your subcontractor’s contracts via a change order. This is done at the beginning of the project prior to issuance of contracts to the subcontractor it is typically incorporated in the contract language, if done after the issuance it can be completed via a change order. I generally do this monthly with each new version of the schedule that is issued so each contractor is contractually obligated to the schedule, at this time it may be necessary to review any impacts to the schedule and determine if a sub is responsible for a delay and if acceleration is costs are due to a to maintain pace or can the project manage the delay.
Now a decision needs to be made on updating the schedule. I have found that schedule updates need to be completed every two weeks with the month end schedule update incorporated into each subcontractor’s contract. With each task being reviewed any problems relating to weather, contract issues, design problems, subcontractor delays, materials delivery or NTC’s all get equally entered into the schedule as a frag-net. If this process is completed diligently your schedule will begin to show a history and tell an accurate story of what event occurred on the project. If proper notice letters are written and project updates are entered without bias, the schedule will be a very valuable tool that will benefit the entire project team.
This story will show the good and helps to identify the cause of the bad, allowing you to make informed course corrections along the way.
This may sound like a lot of work, but dedication and detail may be the difference maker that allows you to be successful and the schedule be the accurate predictor of the future of your project.
John Hughes
Project Superintendent
